TABLE OF CONTENTS
1..... Executive Summary. 3
2..... Getting the Webocrat System Running. 4
2.1. Webocrat System Overview.. 4
2.2. Setting up & Running the
Webocrat System.. 5
2.2.1. Creating and Initialising the
Webocrat Database on a MySQL Server 7
2.2.2. Installation of Tomcat on the Linux
System.. 9
2.2.3. Installation of Tomcat on the
Windows System.. 10
2.2.4. Setting Property Variables of the
Weboract System.. 12
2.2.5. Starting the OntoServer 14
2.2.6. Running the Webocrat System with no HTTP Server 15
2.2.7. Running an HTTP Server 17
2.2.8. Running the Webocrat System through
an HTTP Server 21
2.2.9. Using mod_jk2 as a connector 22
2.3. Summary. 28
3..... Loading a Knowledge Base. 30
3.1. Loading a Newly Created Knowledge
Base. 30
3.2. User and Password Combinations. 27
3.3. Limitations. 28
4..... Multilingual Environment 29
4.1. Adjustments
to Login Pages. 29
4.2. Language
Property Bundle, Common. 31
4.3. Language
Property Bundle for Articles. 38
4.4. Language
Property Bundle for Discussion Forums. 39
4.5. Language
Property Bundle for Opinion Polling. 41
4.6. Language
Property Bundle for Messaging. 43
4.7. Language
Property Bundle for Submissions. 44
4.8. Language
Property Bundle for Forms. 45
4.9. Language
Property Bundle for Web Resources. 46
4.10. Language
Property Bundle for Tenders. 47
4.11. Language
Property Bundle for Web Categories. 50
4.12. Language
Property Bundle for Citizen. 52
4.13. Summary 59
References. 61
The aim of this document is to provide a system administrator with
necessary information, in order to set up and run the Webocrat system on Linux
and Windows.
The
Webocrat system is a Web-based application which is built on top of four
software components. These are
- an HTTP server, called Apache HTTP
server;
- a servlet and JSP container, called Apache Tomcat;
- a relational database server,
called MySQL server;
- a knowledge base server, called
OntoServer.
This document explains how to set up each
of the four software components, and configure the Webocrat system, so that it
can interact with the other four software components. It also describes how
to setup a new language environment, so that the language can be displayed in
the Webocrat graphical user interfaces. All abbreviations which are used in this
document are listed in abbreviations section.
The remainder of this document is organised
as follows: section 2 describes the interaction between the four software
components and the Webocrat system, and lists all the steps necessary to set up
and run the software components and the Webocrat system. Section 3 explains how
a Webocrat user can store a newly created knowledge base into the OntoServer.
Section 4 describes how to setup a new language environment, so that the
language can be displayed in the Webocrat graphical user interfaces.
Section 2.1
describes the Webocrat system interfaces which are used to establish
connections to the following software components.
- an HTTP server, called Apache
HTTP server;
- a servlet and JSP container,
called Apache Tomcat;
- a relational database server,
called MySQL server;
- a knowledge base server, called
OntoServer.
In
addition, the procedure for setting up the four software components and the
Webocrat system on Linux is described in section 2.2.
This
section describes the interactions between the Webocrat system interfaces and
the four software components listed above. The following figure depicts these
interactions.
Figure 2.1
The interaction between the Webocrat system and the four software
components
Figure 2.1
shows three system interfaces which play a role in establishing the connections
to other software components. The following describes the functionality of each
interface.
·
The
servlet and JSP interfaces serve as the front-end of the Webocrat system. The
two interfaces establish a connection to the servlet and JSP container
(Tomcat), and the other two interfaces: database and knowledge base interface.
·
The
database interface establishes a connection between the Webocrat system and the
MySQL server, so that the Webocrat system can access and perform operations,
such as create, insert, update and delete, on the Webocrat and CSAP databases.
·
The
knowledge base interface establishes a connection between the Webocrat system
and a knowledge base server, called the OntoServer, so that the Webocrat system
can access the Webocrat knowledge base, and present it to a Webocrat user.
This
section describes how to set up the software components listed below, in order
to get the Webocrat system running. Note that the configuration and the
software packages which are described in this document are used for a pilot
project. Using other software packages are certainly possible.
|
Software
Name
|
Version
|
Linux Package Name
|
Windows Package Name
|
|
MySQL
Server
|
3.23.57
|
3.23.57-pc-linux-gnu-i686.tar.gz
|
mysql-3.23.58-win.zip
|
|
Apache
Tomcat
|
4.1.27
|
jakarta-tomcat-4.1.27-src.tar.gz
|
jakarta-tomcat-4.1.27.exe
|
|
Tomcat
Connectors
|
4.1.24
|
jakarta-tomcat-connectors-4.1.24-src.tar.gz
|
|
|
Apache Portable
Runtime (APR)
|
2.0.35
|
apr_APACHE_2_0_35.tar.gz
|
|
|
Apache HTTP server
|
2.0.47
|
httpd-2.0.47.tar.gz
|
|
Table 2.1
Five software components which are needed to run the Webocrat system
Both the
Webocrat system and Apache Tomcat are Java applications. It is therefore
necessary to have Java installed prior to the system installation. Either Java
Development Kit (JDK) or Java Runtime Environment (JRE) version 1.3 (or above)
has to be installed. In addition, a C compiler is required to generate a
dynamic shared object of the tomcat connectors (only on Linux Installation).
Therefore, a GCC compiler, version 2.96 (or higher) should be installed, too.
The
Webocrat system and the three software components have been successfully tested
on Red Hat Linux version 7.2. To simplify the description of the following
installation procedure, it is assumed that the software package containing the
Webocrat system has been installed in $WEBOCRAT_HOME. $WEBOCRAT_HOME represents
the absolute path reference of the Webocrat system, and may have the following
value on Linux:
$WEBOCRAT_HOME=/usr/local/Webocrat
or on
Windows:
%WEBOCRAT_HOME%=C:\Program Files\Apache Group\Tomcat
4.1\webapps\webocrat
In order to be able to communicate with a MySQL
server, the Webocrat system needs a database driver, called Java Database
Connectivity (JDBC) driver. The associated driver file name is mysql-connector-java-2.0.14-bin.jar,
which should be found in
$WEBOCRAT_HOME/WEB-INF/lib.
Each version of a MySQL server may need a different version of a JDBC driver.
It is therefore necessary to ensure that the Webocrat system uses an
appropriate version of a JDBC driver to communicate with a MySQL server. The
JDBC driver is available at [http://www.mysql.com].
To create and initialise the Webocrat
database on a MySQL server, the following five steps have to be carried out.
Step 1: a. Installing a MySQL server on Linux.
The MySQL
server package is available at [http://www.mysql.com/downloads/].
The RPM-MySQL
server package can be used to install the MySQL server. The name of the package
is MySQL-server-3.23.57.i386.rpm If the rpm version does not work, the binary
version, 3.23.57-pc-linux-gnu-i686.tar.gz can be installed at /usr/local. The
following commands have to be executed to install the binary one.
shell> groupadd mysql
shell> useradd -g mysql mysql
shell> cd /usr/local
shell> gunzip < 3.23.57-pc-linux-gnu-i686.tar.gz
| tar xvf -
shell>
ln -s
/usr/local/mysql-3.23.57 mysql
shell>
cd mysql
shell>
scripts/mysql_install_db
shell>
chown -R root .
shell>
chown -R mysql data
shell>
chgrp -R mysql .
The two dot
characters which are located at the end of the chown and chgrp commands
represent the current directory reference. To set the password for a root user
in mysql, the following command has to be executed.
shell>mysqladmin
-u root password -p
The password
must not necessarily be the same as the system root password. Both, the
username, root and the password, are used by the MySQL server, and not the
Linux system. The detailed description of the installation procedure for the
MySQL server can be found in
[http://www.mysql.com/documentation/mysql/bychapter/manual_Installing.html#Linux-RPM].
The root directory of MySQL may have the following path.
$MySQL_HOME=/usr/local/mysql
It is
recommended that $MySQL_HOME/bin is included in the system variable, PATH, so
that MySQL commands can be executed from anywhere. This can be achieved by editing
a profile file, /etc/profile.
b.
Installing a MySQL server on Windows:
The MySQL
server package is available at [http://www.mysql.com/downloads/].
The MySQL
server package can be used to install the MySQL server. The name of the binary
package is mysql-3.23.58-win.zip.
To install MySQL on Windows using
a binary distribution, follow this procedure:
·
If
you are working on a Windows NT, 2000, or XP machine, make sure you have logged
in as a user with administrator privileges.
·
If
you are doing an upgrade of an earlier MySQL installation, it is necessary to
stop the current server. On Windows NT, 2000, or XP machines, if you are
running the server as a Windows service, stop it as follows from the command
prompt:
· C:\> NET STOP MySQL
·
If
you plan to use a different server after the upgrade (for example, if you want
to run mysqld-max rather
than mysqld), remove the existing service:
C:\mysql\bin> mysqld --remove
·
You
can reinstall the service to use the proper server after upgrading. If you are
not running the MySQL server as a service, stop it like this:
C:\mysql\bin> mysqladmin -u root shutdown
·
Exit
the WinMySQLAdmin program if it is running.
·
Unzip
the distribution file to a temporary directory.
·
Run
the setup.exe program to begin the installation
process. If you want to install MySQL into a location other than the default
directory (`C:\mysql'), use the
Browse button to specify your preferred
directory. If you do not install MySQL into the default location, you will need
to specify the location whenever you start the server. Finish the install
process.
The detailed
description of the installation procedure for the MySQL server on Windows
systems can be found in
[http://www.mysql.com/documentation/mysql/bychapter/manual_Installing.html#Windows_installation].
The root
directory of MySQL may have the following path.
%MySQL_HOME%=C:\mysql
Step 2: a. Running MySQL on Linux
There are two
alternatives to run MySQL. The first alternative is to run a MySQL server.
shell>
/usr/local/mysql/bin/mysqld
The second one
is to run a MySQL daemon server. The associated executable file is called
safe_mysqld. Go to $MySQL_HOME, and execute the following command.
shell>
/usr/local/mysql/bin/safe_mysqld
Instead of
executing the mysqld, it is more reliable to use safe_mysqld to run a MySQL
daemon server.
b. Running MySQL on Windows
If you are working on Windows
95, 98 or Me, to start the mysqld server, you should start a
console window (a DOS window) and enter this command:
shell>
C:\mysql\bin\mysqld
This
will start mysqld
in the background.
To
stop the MySQL server on Windows 95, 98 or Me execute this command:
shell>
C:\mysql\bin\mysqladmin -u root shutdown
This
invokes the MySQL administrative utility mysqladmin to connect to the server and
tell it to shut down.
If you are working on Windows
NT family (Windows NT, 2000, or XP), the recommended way to run MySQL is to
install it as a Windows service. Then Windows starts and stops the MySQL server
automatically when Windows starts and stops. A server installed as a service
can also be controlled from the command line using NET commands, or with the graphical Services utility.
The Services utility (the Windows Service Control Manager)
can be found in the Windows Control Panel (under Administrative
Tools on Windows 2000). It is
advisable to close the Services utility while performing server installation or
removal operations from this command line. This prevents some odd errors.
Step 3: Creating and initialising the
Webocrat and CSAP databases.
In order to
create and initialise the Webocrat database in Linux system, two shell scripts,
install_webocrat_db.sh and install_csap_db.sh should be executed. Go to the
$WEBOCRAT_HOME/scripts and subsequently execute the following two commands. In
the newer version only the MySQL.sql script may be used instead of following
three scripts.
shell>/bin/sh install_webocrat_db.sh
shell>/bin/sh install_csap_db.sh
shell>/usr/local/mysql/bin/mysql
< csap_update.sql
The two scripts can be found in
$WEBOCRAT_HOME/scripts. The shell scripts execute two SQL scripts,
webocrat_db.sql and csap_db.sql, in order to create and initialise two
databases. These are webocrat and csap. In the case where there have been
two databases named webocrat and
csap, a backup copy has to be made to save the two existing databases. The
sql script, called csap_update.sql, must also be executed, in order to update
the existing csap database.
If you use a
Windows system you should move to %MySQL_HOME%/bin directory and connect to
MySQL server by executing mysql.exe file. In MySQL command prompt:
mysql> source %WEBOCRAT_HOME%\scripts\MySQL.sql
This command
executes SQL script which creates databases webocrat and csap, all
necessary tables and initialises them.
Step 4:
Checking the Webocrat database installation.
To check whether the two databases have
been successfully created by the MySQL server, it is recommended that a system
administrator carries out the following steps.
·
connect
to the MySQL server by executing an executable file, mysql,
In Linux:
shell> /usr/local/mysql/bin/mysql
or in Windows:
shell> C:\mysql\bin\mysql.exe
A MySQL command prompt, mysql>, will
appear.
·
subsequently
execute the following MySQL commands.
mysql>
show databases;
A list which contains a set of
databases is displayed. The csap and webocrat databases must be found
within the list.
mysql> use csap;
mysql> show tables;
A list which contains 8 tables,
which belong to the csap database, is displayed. These are
Step 5:
Setting up permissions.
In order to grant access to the webocrat and
csap databases for the Webocrat system, the following commands have to be
carried out from mysql.
mysql> grant all privileges on webocrat.* to root@"%"
identified by
'root password';
mysql> grant all privileges on csap.* to root@"%"
identified by 'root password';
Both, the
username, root and the password, belong the MySQL server, and not the Linux
system. In other words, the root and password mentioned above is the MySQL root
and password, and should not necessarily be the same as the system root
password. In this example, we assume that only root can access the webocrat and
csap databases. The two command lines grant a MySQL user, called root, access
to the webocrat and csap databases from any host. The root and password must
also be set in the Webocrat system property variables. Section 2.2.3 describes
the property variables.
If you are
working in Linux system it is also necessary to ensure that the directory
$MySQL_HOME/data has the following privilege read, write and execute (rwx)
attributes for owner and group with respect to the webocrat and csap databases.

Figure 2.2 The
privilege attributes of the webocrat and csap databases which are located at
$MySQL_HOME/data.
To set up the Webocrat system in Tomcat,
the following three steps have to be carried out.
Step 1: Installing Tomcat.
The package,
jakarta-tomcat-4.1.27.tar.gz is available at
[http://apache.secsup.org/dist/jakarta/tomcat-4/binaries/].
Step 2: Configuring Tomcat. In order
to configure Tomcat, two variables have to be defined.
·
The first variable is called JAVA_HOME. The value of this variable should
refer to the absolute path reference of a Java Development Kit (JDK) or Java
Runtime Environment (JRE). Either JDK or JRE version 1.2 (or above) has to be
installed, in order to run Tomcat.
·
The second variable is called
CATALINA_HOME. The value of this variable should refer to the absolute path
reference in which the Tomcat has been installed. It might have the following
value.
·
$CATALINA_HOME=/usr/local/jakarta-tomcat-4.1.27
The most common
way to define a global variable is by stating the variable in a profile file,
/etc/profile. To define the two variables, the following two command lines
should be inserted into the profile file.
export
JAVA_HOME = <the absolute path reference in which Java is installed>
export
CATALINA_HOME=<the absolute path reference in which Tomcat is installed>
In Tomcat 4, a new servlet container is
implemented. The container is called Catalina. This explains why the second
variable is called CATALINA_HOME.
Step 3: Running Tomcat.
To run Tomcat,
a shell script, startup.sh, which is located at
$CATALINA_HOME/bin,
has to be executed.
Jakarta Tomcat
package is available at [[http://apache.secsup.org/dist/jakarta/tomcat-4/binaries/].
The name of the binary installation file is jakarta-tomcat-4.1.27.exe.
To
install Tomcat on Windows using a binary distribution, follow this procedure:
·
If
you are working on a Windows NT, 2000, or XP machine, make sure you have logged
in as a user with administrator privileges.
·
Run the
jakarta-tomcat-4.1.27.exe
installation program to begin
the installation process. Following dialog will appear:
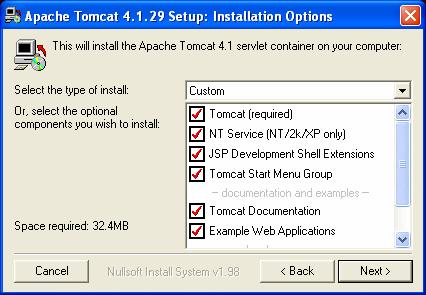
If you are
working on Windows NT family (Windows NT, 2000, or XP), the
recommended way to run Apache Tomcat is to install it as a Windows service.
Then Windows starts and stops the Tomcat server automatically when Windows
starts and stops. A server installed as a service can also be controlled from the
command line using NET
commands, or with the graphical Services utility. If you want to install Tomcat server as
Windows Service check NT Service (NT / 2k/XP only) box in previous dialog.
·
The next dialog enables you to
change default directory (C:\Program Files\Apache Group\Tomcat 4.1), where
Tomcat will be installed to.

If
you want to install Apache Tomcat into a location other than the default
directory, use the Browse button to specify your preferred directory.
·
Press
Install button and start the installation process.
The detailed
description of the installation procedure for the Tomcat server on Windows
systems can be found in
[http://jakarta.apache.org/tomcat/tomcat-4.1-doc/index.html].
Running
Tomcat.
When you have installed Tomcat
server as a service, the system can start and stop the Tomcat server
automatically when Windows starts and stops. On other side, when you have
installed Tomcat server as a standalone
application, starting and stopping of Tomcat server you can do by Start Tomcat and Stop Tomcat shortcuts
created in start menu.
Tomcat reserves the port 8080 on the local
machine (or localhost). By typing http://localhost:8080
at a browser, Tomcat should display the following figure.
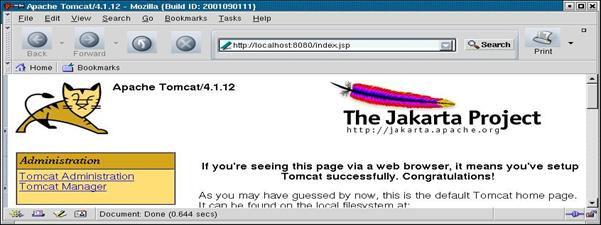
Figure 2.3 Tomcat homepage
Figure 2.3
shows that Tomcat has been successfully installed and is up and running. In
order to connect Tomcat to the Webocrat System, the following two steps have to
be carried out.
Step 4: Shutting down Tomcat.
To stop Tomcat,
a shell script, shutdown.sh which is located at
$CATALINA_HOME/bin,
has to be executed.
Step 5: Integrating the Webocrat System
into Tomcat.
To integrate
the Webocrat system into Tomcat, the Webocrat package should be moved from the
current directory into $CATALINA_HOME/webapps, in which all the Web
applications are placed. The Webocrat may now have the following path.
$WEBOCRAT_HOME = $CATALINA_HOME/webapps/Webocrat
In addition, some property variables of the
Webocrat system have to be set, and the OntoServer should be started, before
restarting Tomcat. The following two subsections describe the variable setting,
and how to run the OntoServer.
There are
two property files which contain the Webocrat system variables. These are
- $WEBOCRAT_HOME/WEB-INF/classes/webocrat.properties
- $WEBOCRAT_HOME/home/csap/csap.xml
The following table lists and describe the
meaning of the Webocrat system variables, which should be set correctly, in the
webocrat.properties. The first column lists all the variables. The second
column describes the meaning of each variable.
|
Webocrat System Variable Name
|
Variable
Meaning
|
|
PropertyManager.propertyPath
|
the
absolute path reference of the webocrat.properties file
|
|
DbConnectionDefaultPool.username
|
the
username that is required by a MySQL server
|
|
DbConnectionDefaultPool.password
|
the
password that is required by a MySQL server
|
|
DbConnectionDefaultPool.server
|
the
Webocrat database reference
|
|
DbConnectionDefaultPool.driver
|
the
database driver which is required to establish a connection to a MySQL server
|
|
DbSearchIndexer.indexPath
|
The
absolute path reference of the directory in which a document is indexed
|
|
DbConnectionDefaultPool.logPath
|
the
absolute path reference of the Webocrat log file
|
|
CSAPUserAdapter.csapHome
|
the
absolute path reference of the CSAP home directory
|
Table 2.2 The name and the meaning of the eight
Webocrat system variables which are stored in the webocrat.properties.
Let us
assume, that
$WEBOCRAT_HOME=/usr/local/jakarta-tomcat-4.1.27/webapps/Webocrat
and the MySQL server has been running on
the same machine. The eight variables can be set with the following values.
|
Webocrat System Variable Name
|
Webocrat System Variable Value
|
|
PropertyManager.
PropertyPath
|
/usr/local/jakarta-tomcat-4.1.27/webapps/Webocrat/
WEB-INF/classes/webocrat.properties
|
|
DbConnectionDefaultPool.
Username
|
root
|
|
DbConnectionDefaultPool.
Password
|
root
password
|
|
DbConnectionDefaultPool.
Server
|
jdbc:mysql://localhost/webocrat
|
|
DbConnectionDefaultPool.
Driver
|
org.gjt.mm.mysql.Driver
|
|
DbSearchIndexer.
IndexPath
|
/usr/local/jakarta-tomcat-4.1.27/webapps/Webocrat/
home/index
|
|
DbConnectionDefaultPool.
LogPath
|
/usr/local/jakarta-tomcat-4.1.27/webapps/Webocrat/
WEB-INF/classes/logs/webocratDbLog.log
|
|
CSAPUserAdapter.
CsapHome
|
/usr/local/jakarta-tomcat-4.1.27/webapps/Webocrat/
home/csap
|
Table 2.3 The name and the value of the eight
Webocrat system variables, which have to be set correctly, in the
webocrat.properties
The DbConnectionDefaultPool.username, DbConnectionDefaultPool.password, and
DbConnectionDefaultPool.Driver can be set with other valid values. The
username and password which are set in this property file must be granted with
access privilege to the webocrat and csap databases (as described in section
2.2.1 step 5).
In the second property file, csap.xml, the
two parameters, dbUrl and dbDriver, should be set with an appropriate
value. The following table lists the two values along with their associated
meaning and value.
|
CSAP
Variable
Name
|
CSAP
Variable
Meaning
|
CSAP
Variable Value
|
|
DbUrl
|
the CSAP
database reference
|
jdbc:mysql://localhost/csap
|
|
DbDriver
|
the
database driver which is required to establish a connection to a MySQL server
|
org.gjt.mm.mysql.Driver
|
Table 2.4 The name and the value of the two
CSAP variables, which have to be set correctly, in the csap.xml
Incorrectly
setting a database reference or having no access privilege to the webocrat and
csap databases can result in the following error message when the Webocrat
system is started.
java.lang.InstantiationException: class
org.webocrat.wbc.skin.SkinBean
The error
message means that the Webocrat system cannot find a valid database reference.
In turn, the Webocrat system is not able to establish a connection to a MySQL
server. It is therefore necessary to ensure that the two system variables,
"DbConnectionDefaultPool.Server" and "DbUrl", and the
database driver are correctly set.
The
OntoServer is a Java application, and does not depend on any other three
software components: MySQL, Tomcat and HTTP server. In order to start the
OntoServer, a JDK (or JRE) version 1.3 (or above) has to be installed. A shell
script, start_ontoserver.sh should then be executed. The shell script can be
found in $WEBOCRAT_HOME/scripts. Prior to the execution of the shell script,
the environment variable, WEBOCRAT_HOME in the shell script must be set with
the absolute path reference of the Webocrat system. The shell script contains
five command lines.
- export WEBOCRAT_HOME=/usr/local/
i.
jakarta-tomcat-4.1.27/webapps/Webocrat
- export
CLASSPATH=$WEBOCRAT_HOME/WEBINF/lib/tuk_okbc_whole.jar:
a.
$WEBOCRAT_HOME/WEB-INF/classes
- export
TUKOS_HOME=$WEBOCRAT_HOME/kmm
- $JAVA_HOME/bin/rmiregistry &
- java
-cp $CLASSPATH -Dtukos.home=$TUKOS_HOME
org.webocrat.kmm.ontoserver.OntoServer -port 5432 -test -verbose
The first
line sets the absolute path reference of the Webocrat directory. The second
line sets all the Java classes which are necessary to run the OntoServer. If
the CLASSPATH is not correctly set, or the Java classes are not complete, the
following error message will appear.
Exception in thread "main"
java.lang.NoClassDefFoundError:
org/webocrat/kmm/server/OntoServer
This error message says that Java cannot
run the OntoServer due to the unavailability of the classes used. It is
therefore necessary to check whether the Java classes which are defined in the
CLASSPATH do exist. The third line sets the absolute path reference of the
OntoServer home directory path reference. Given the directory path reference,
the OntoServer can determine the location of the Webocrat knowledge base,
called webocrat_ontology.ontokb, which is stored in the directory, $TUKOS_HOME/kbs.
The fourth line starts the Remote Method Invocation (RMI) registry. The final
line calls a Java Virtual Machine (JVM) to run the OntoServer. At start-up
time, the OntoServer outputs the following messages.
·
144.234.11.110
webocrat.wlv.ac.uk
·
RMI
Admin Server ready ...
·
Starting
OKBC server on port 5432.
The three
line messages say that the OntoServer has recognised the IP address and loaded
the users configuration successfully. They also say that the OntoServer has
registered to the RMI object and is ready to accept a request on port 5432.
If you are
working on the Windows system, in order to start the OntoServer, move to %WEBOCRAT_HOME%\WEB-INF\classes\test\kmm
directory. Open file tukserver.bat, edit variables JDK_HOME and TOMCAT_HOME and
start the tukserver.bat file.
To shut
down the OntoServer, press Ctrl C. The term, OKBC which appears in the third
message stands for Open Knowledge Base Connectivity (Chaudhri
et al. 1998a, 1998b).
The OntoServer is built on top of OKBC, in order to access, update and create
the Webocrat knowledge base. Chapter 3 discusses this issue in detail.
In order to
run the Webocrat system with no HTTP server, the following steps have to be
carried out subsequently.
Step 1:Running a MySQL server, or a MySQL
daemon server, if it has not been running yet
(see section
2.2.1, step 2).
Step 2: Shutting down the OntoServer and
Tomcat
Step 3: Subsequently restarting the
OntoServer and Tomcat.
Assuming
that a MySQL server, an OntoServer and Tomcat have been running, the Webocrat
system can now be started. By typing http://localhost:8080/Webocrat at a browser, the following
figure will be displayed.

Figure 2.4 Webocrat homepage
To check whether the Webocrat knowledge
base can be accessed, click the Main Page menu item. The following figure
shows an example of the structure of the top level of the Webocrat knowledge
base. A Webocrat user may view another structure of another knowledge base.
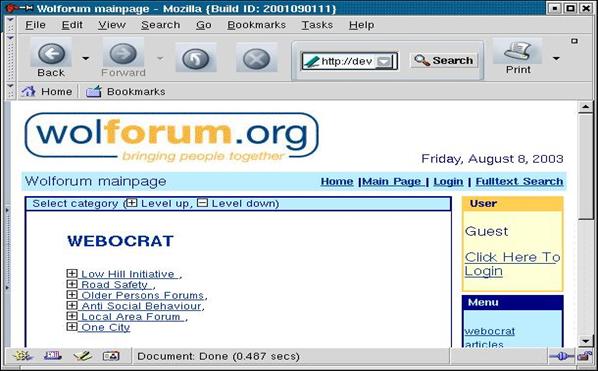
Figure 2.5 The structure of the top level of the
Webocrat knowledge base
The final step is to establish a connection
between Tomcat and an HTTP server, and run the HTTP server. The following five
steps have to be carried out.
Step 1: Installing an HTTP server.
The Apache HTTP
server package, httpd-2.0.47.tar.gz is available at
[http://httpd.apache.org/download.cgi]. The installation procedure is described in
INSTALL.txt, which can be found in the root directory of the software package.
A detailed description is available at [http://httpd.apache.org/docs-2.0]. To simplify
the description of the installation procedure, it is assumed that an HTTP
server has been installed in
/usr/local/apache2
Step 2:
Installing a connector.
A connector establishes a connection between
Tomcat and HTTP server. The software package, jakarta-tomcat-connectors-4.1.24-src.tar.gz is available at
http://jakarta.apache.org/builds/jakarta-tomcat-4.0/release/v4.1.24/src/.
Prior to installing the tomcat connectors, the
following software packages must be installed.
·
Installing
autoconf version 2.5 (or higher), e.g. autoconf-2.5.tar.gz. The package is
available at [http://ftp.gnu.org/gnu/autoconf]. The installation procedure is
described in INSTALL which can be found in the root directory of the autoconf
package.
·
Installing
libtool version 1.3.5 (or higher), e.g.
libtool-1.3.5.tar.gz. The package is available at
[http://ftp.gnu.org/gnu/libtool]. The installation procedure is described in
INSTALL which can be found in the root directory of the libtool package.
·
Installing
the binary version of ant version 1.5.4 (or higher), e.g.
apache-ant-1.5.4-bin.tar.gz. The package is available at
[http://ant.apache.org/bindownload.cgi].
·
Installing
Apache Portable Runtime (APR), e.g. apr_APACHE_2_0_35.tar.gz. The package is
available at
[http://jakarta.apache.org/builds/jakarta-tomcat-connectors/webapp/release/v1.2.0/src].
The installation procedure is described in README.dev which can be found in the
root directory of the APR package. Let us now assume that APR has been
installed at
/usr/local/apr
To establish a connection between Tomcat and an
HTTP server, a connector module is required. There are two connector modules
which can be used to connect Tomcat to an HTTP server. These are mod_webapp
and mod_jk2. This section describes the mod_webapp module. The second
connector module, mod_jk is described in section 2.2.8.
To install the mod_webapp, the following commands have to be executed.
shell> cd /usr/local
shell> gunzip
jakarta-tomcat-connectors-4.1.24-src.tar.gz
shell> tar -xvf
jakarta-tomcat-connectors-4.1.24-src.tar
shell> cd jakarta-tomcat-connectors-4.1.24/webapp
shell> ./support/buildconf.sh
shell> ./configure \
--with-apxs=/usr/local/apache2/bin/apxs \
--with-apr=/usr/local/apr \
--enable-debug
\
--enable-java=/usr/local/jakarta-tomcat-4.1.27
shell> cd webapp
shell> make
If the source compilation is successful, the
two files that we need can now be found in
/usr/local/jakarta-tomcat-connectors-4.1.24/build. Then,
·
the
mod_webapp.so should be copied into /usr/local/apache2/modules;
·
the
tomcat-warp.jar should be copied into
/usr/local/jakarta-tomcat-4.1.27/server/lib.
Step 3: Configuring Tomcat.
Tomcat should be configured, such that Tomcat
can communicate with the HTTP server and handle a user request. The Tomcat
configuration file, server.xml, which can be found in $CATALINA_HOME/conf,
should have the following XML fragment.
<!--
Define an Apache-Connector Service -->
<Service name="Tomcat-Apache">
<Connector
className="org.apache.catalina.connector.warp.WarpConnector"
port="8008"
minProcessors="5"
maxProcessors="75"
enableLookups="true"
appBase="webapps"
acceptCount="10"
debug="0"/>
<Engine
className="org.apache.catalina.connector.warp.WarpEngine"
name="wolforum.webocrat.org"
debug="0">
<Logger
className="org.apache.catalina.logger.FileLogger"
prefix="apache_log."
suffix=".txt"
timestamp="true"/>
<Realm
className="org.apache.catalina.realm.MemoryRealm" />
</Engine>
</Service>
Figure 2.6 An XML fragment which should be inserted into
the Tomcat configuration file, server.xml if mod_webapp connector is used
Given the XML fragment, Tomcat instantiates a
service, which establishes a connection between Tomcat and an HTTP server at
port 8008. The attribute, name of the XML tag, Engine should be filled with
an appropriate reference of a running HTTP server. In this example, the URL
reference of the HTTP server is wolforum.webocrat.org.
Step 4:
Configuring the HTTP server.
The HTTP server should be configured, such that
it can communicate with Tomcat, and redirect a user request to Tomcat. The HTTP
server configuration file, called httpd.conf, which can be found in
$HTTP_Server_HOME/configs, should contain the following lines.
1. ServerRoot
/usr/local/apache2
2. Listen 80
3. LoadModule
webapp_module
modules/mod_webapp.so
4. ServerAdmin
webmaster@webocrat.org
5. DocumentRoot /usr/local/webocrat/www
6. <Directory
/usr/local/webocrat/www>
7. NameVirtualHost *
(1) defines the root directory in which the
HTTP server has been installed.
(2) defines the port that is used by the
server.
(3) defines the connector reference, which is
described in step 2. The HTTP server will then load a library module, called
mod_webapp.so, and use the module as a connector which establishes a connection
between the HTTP server and Tomcat.
(4) defines the email address of a webmaster.
(5) & (6) set the root directory in which a
Web application package should be stored. (7) determines that a number of
virtual host are used. A virtual host can be defined as follows:
<VirtualHost *>
ServerName
wolforum.webocrat.org:80
WebAppConnection warpconnection1 warp localhost:8008
DocumentRoot
/usr/local/webocrat/www/
WebAppDeploy
Webocrat warpconnection1 /Webocrat
ServerAdmin
webmaster@webocrat.org
ErrorLog
/usr/local/apache2/logs/error_log
CustomLog
/usr/local/apache2/logs/access_log
common
</VirtualHost>
The XML fragment shows how a virtual host can
be defined, and a Web application can be deployed. In particular, it defines
·
a
virtual host which reserves a port. In this example, the virtual host name is
wolforum.webocrat.org, which reserves port 80;
·
a
connection which establishes a connection between the HTTP server and Tomcat.
In this example, the connection name is warpconnection1 which operates on
localhost:8008. A connector which is defined in the Tomcat configuration file
should reserve the same port (see figure 2.5);
·
a
document root at which the HTTP server will start looking for a directory (or
file) when a user request is submitted. In this example, the document root is
/usr/local/webocrat/www/;
·
the
deployment of a new application, called Webocrat, which is placed under the
directory /Webocrat;
·
a
server administrator email address;
·
a
server error and access log file path names.
To check whether the configuration is correct,
the following command must be executed.
shell>
/usr/local/apache2/bin/apachectl
configtest
If the configuration is successful, the
message, Syntax OK will appear.
Step 5:
Copy /usr/local/jakarta-tomcat-4.1.27/webapps/Webocrat
into
/usr/local/webocrat/www.
Step 6:
Shutting down and restarting Tomcat (see section 2.2.2, step 3 and 4).
Step 7:
Running the HTPP server.
To run the HTTP server, a control script,
apachectl, which can be found in $ HTTP_Server_HOME/bin should be executed as
follows:
shell>
/usr/local/apache2/bin/apachectl k
start
To shut
down the HTTP server, the apachectl should be executed as follows:
shell> /usr/local/apache2/bin/apachectl k stop
To restart
the HTTP server, the apachectl should be executed as follows:
shell> /usr/local/apache2/bin/apachectl k restart
In order to run the Webocrat system through
the HTTP server, the following steps have to be carried out.
Step 1:Running a MySQL server, or a MySQL
daemon server.
Step 2:
Shutting down the OntoServer, Tomcat and the HTTP server.
Step 3:
Subsequently restarting the OntoServer, Tomcat and the HTTP server.
If the
installation and configuration of an HTTP server and Tomcat are correctly
performed, the Webocrat system can be accessed from a virtual host, which is
described in section 2.2.6, step 3. In this example, the URL reference of the
Webocrat start page is http://wolforum.webocrat.org/Webocrat.
As
described in section 2.2.6 (step 2), a connector is required in order to
establish a connection between Tomcat and an HTPP server. This section
describes the procedure for installing a connector module, called, mod_jk2.
Step 1:
Make sure that the software packages listed below have been installed.
·
Libtool
1.3.5 (or higher);
·
Autoconf
2.5;
·
Apache
http server 2.0;
·
Apr
2.0.35;
·
Ant
1.5.4
(see section 2.2.6 step 2).
Step 2:
Download and unpack the following two software packages.
1. jakarta-tomcat-connectors-4.1.24-src.tar.gz which is available at
[http://jakarta.apache.org/builds/jakarta-tomcat-4.0/release/v4.1.24/src/];
2.
jakarta-tomcat-connectors-jk2-src-current.tar
which is available at
[http://jakarta.apache.org/site/sourceindex.cgi].
Step 3:
Replace the jk directory from the jakarta-tomcat-connectors-4.1.24-src.tar.gz
with
the jk
directory from jakarta-tomcat-connectors-jk2-src-current.tar.
Step 4: Execute the following commands.
Let
us assume that jakarta-tomcat-connectors-4.1.24 has been installed in
/usr/local
shell> cd
/usr/local/jakarta-tomcat-connectors-4.1.24-src/
jk/native2
shell> buildconf.sh
shell>
configure \
--with-apxs2=/usr/local/apache2/bin/apxs \
--with-java-home=/usr/java/j2sdk1.4.0 \
--with-java-platform=2 \
--enable-jni \
--enable-debug \
--with-apr=/usr/local/apr \
--enable-java=/usr/local/jakarta-tomcat-4.1.27
shell> make
If the source compilation is successful, the
two modules, mod_jk2.so and jkjni.so can now be found in
/usr/local/jakarta-tomcat-connectors-4.1.24/ jk/build/jk2/apache2.
Step 5:
Copy mod_jk2.so and jkjni.so to /usr/local/apache2/modules
Step 6:
Copy
/usr/local/jakarta-tomcat-connectors-4.1.24-src/jk/conf/jk2.properties
to
/usr/local/jakarta-tomcat-4.1.27/conf
and
copy /usr/local/jakarta-tomcat-connectors-4.1.24-src/jk/conf/workers2.properties
to
/usr/local/apache2/conf
In addition, the HTTP server and Tomcat should
be configured, such that it can communicate with Tomcat, and redirect a user
request to Tomcat. The following two steps, step 7 and 8, explain the
configuration issues.
Step 7:
Configure Tomcat
On the Tomcat side, the
/usr/local/jakarta-tomcat-4.1.27/conf/jk2.properties should contain the
following lines.
handler.list=apr,request,container,channelApr
[uri:/Webocrat/*]
info=Map the whole Webocrat
The first line specifies the tomcat connector
handlers which should be instantiated. The last handler, channelApr maintains
a socket which is used for a communication channel. There are four types of
sockets which can be used for a communication channel. These are
channelSocket, channelApr, channelUnix and channelJni. In this example,
an APR channel is used.
The Tomcat configuration file,
/usr/local/jakarta-tomcat-4.1.27/conf/server.xml should have the following XML
fragment.
<!--Define a Coyote/JK2 AJP 1.3 Apache-Connector Service -->
<Service name="Tomcat-Apache">
<Connector
className="org.apache.coyote.tomcat4.CoyoteConnector"
port="8009"
minProcessors="5"
maxProcessors="75"
enableLookups="true"
appBase="webapps"
acceptCount="10"
debug="1"
connectionTimeOut="5000"
useURIValidationHack="false"
protocolHandlerClassName="org.apache.jk.server.JkCoyoteHandler"/>
<Engine name="Apache"
defaultHost=" wolforum.webocrat.org"
debug="1">
<Logger className="org.apache.catalina.logger.FileLogger"
prefix="apache_log."
suffix=".txt"
timestamp="true"/>
<Realm
className="org.apache.catalina.realm.MemoryRealm"/>
</Engine>
</Service>
Figure 2.7 An XML fragment which should be inserted into
the Tomcat configuration file, server.xml if mod_jk2 connector is used
Given the XML fragment, Tomcat instantiates a
service, which establishes a connection between Tomcat and an HTTP server at
port 8009. The attribute, defaultHost of the XML tag, Engine should be
filled with an appropriate reference of a running HTTP server. In this example,
the URL reference of the HTTP server is wolforum.webocrat.org.
Step 8:
Configure the HTTP server.
On the HTTP server side, the
/usr/local/apache2/conf/worker2.properties should contain the following lines.
[workerEnv:]
info=Global server options
timing=1
debug=10
[config:]
file=/usr/local/apache2/conf/workers2.properties
debug=10
debugEnv=10
[logger.file:10]
level=DEBUG
file=/usr/local/apache2/logs/jk2.log
debug=10
[logger]
level=DEBUG
debug=10
[shm:]
info=Scoreboard. Required for reconfiguration and
status
with multiprocess servers
file=/usr/local/apache2/logs/jk2.shm
size=1000000
debug=10
disabled=0
[lb:lb]
info=Default load balancer.
debug=10
[channel.apr:localhost:8009]
info= using APR channel for communication
tomcatId=localhost:8009
lb_factor=1
group=lb
keepalive=1
timeout=60
debug=10
[status:status]
info=Status worker, displays runtime informations
[uri:/jkstatus/*]
infor=Display status information about mod_jk2 and
check config for changes.
worker=status:status
[uri:/Webocrat/*]
info=Map the whole Webocrat
group=lb
context=/Webocrat
debug=10
As described in section 2.2.6 (step 4), the
HTTP server configuration file, /usr/local/apache2/httpd.conf, should contain
the following lines.
ServerRoot /usr/local/apache2
Listen 80
LoadModule jk2_module modules/mod_jk2.so
ServerAdmin webmaster@webocrat.org
DocumentRoot /usr/local/webocrat/www
<Directory /usr/local/webocrat/www>
NameVirtualHost
*
<VirtualHost *>
ServerName
wolforum.webocrat.org:80
ServerAdmin webmaster@democrat.org
DocumentRoot /usr/local/webocrat/www/
ErrorLog /usr/local/apache2/logs/error_log
CustomLog /usr/local/apache2/logs/access_log
common
</VirtualHost>
The difference between this configuration
and the previous one (as described in section 2.2.4 step 4) is that
mod_jk2.so is used as the connector module.
The
Webocrat system is an application which consists of the following three
interfaces.
·
The
database interface establishes a connection between the Webocrat system and the
MySQL server;
·
The
servlet and JSP interfaces establish connections between the Webocrat system,
and Tomcat
·
The
knowledge base interface establishes a connection between the Webocrat system
and the OntoServer;
A number of
software components are required to support the Webocrat system. The following
table summarises all of them in an alphabetical order.
|
Software
Package Name
|
Version
|
|
Ant
|
1.4.1
|
|
APR
|
2.0.35
|
|
Autoconf
|
2.52
|
|
GCC
|
2.96
|
|
HTTP
server
|
2.0.47
|
|
Jakarta
Tomcat
|
4.1.27
|
|
Jakarta
Tomcat Connectors (JTC)
|
4.1.24
|
|
JDK / JRE
|
1.3
|
|
Libtool
|
1.4
|
|
MySQL
|
3.23.57
|
Table 2.5 All the software packages
which are needed to get the Webocrat
system running.
In order to
run the Webocrat system, and fully exploit all the system features, it is
important that each interface can interact with the other three software
components: a MySQL server, an HTTP server and Tomcat. In addition, the
Webocrat system properties, which are listed in table 2.1 - 2.3, have to be set
correctly. In the case where one of the software components is shut down and we
want to restart it again, it is necessary to carry out the three steps which
are described in section 2.2.7.
To run the
Webocrat system and the other software components which support the system, a
number of shell scripts and executable files have to be subsequently executed.
The following table lists all the shell scripts in the order in which the shell
scripts must be executed. The first column lists all the shell scripts and executable
files. The second column lists the corresponding directory path references,
i.e. the directories in which the shell scripts or executable files are stored.
The third column describes the function of each shell script or executable
file.
|
Script or executable file
|
Directory path reference
|
Function
|
|
mysqld
(or safe_mysqld)
|
$MySQL_HOME/bin
|
starting a MySQL server
(or a MySQL daemon server)
|
|
start_ontoserver.sh
|
$WEBOCRAT_HOME/scripts
|
starting
the OntoServer
|
|
startup.sh
|
$CATALINA_HOME/bin
|
starting
Tomcat
|
|
apachectl
k start
|
$HTTP_Server_HOME/bin
|
starting an HTTP server
|
Table 2.4 The list of all the shell scripts and
executable files for running a software component.
Analogously,
the following table lists all the shell scripts and executable files which are
used to shut down a software component.
|
Script or executable file
|
Directory path reference
|
Function
|
|
mysqladmin -u root
shutdown -p
|
$MySQL_HOME/bin
|
shutting down a MySQL server (or a MySQL
daemon server)
|
|
shutdown.sh
|
$CATALINA_HOME/bin
|
shutting down
Tomcat
|
|
apachectl -k stop
|
$HTTP_Server_HOME/bin
|
shutting
down an HTTP server
|
Table 2.5 The list of all the shell scripts and
executable files for shutting down a software component.
To shut
down the OntoServer, press Ctrl C.
In section 2.2.4, how to run the OntoServer
is described. This chapter explains how a newly created knowledge base can be
loaded into the OntoServer via an editor, called Protégé (Grosso et al. 1999;
Noy et al. 2000a,2000b), and application program interfaces, called Open
Knowledge Base Connectivity (OKBC) (Chaudhri et al. 1998a, 1998b). The
OntoServer is built on top of OKBC. The following figure depicts the
interaction between the OntoServer and Protégé via OKBC.
Figure 3.1
The interaction between the OntoServer and Protégé via OKBC
Figure 3.1
illustrates a bi-directional communication between the OntoServer and Protégé.
In order to load a newly created knowledge base, a connection between the
OntoServer and Protégé via OKBC should be established. On the Protégé side,
OKBC is used to transfer a knowledge base to the OntoServer. On the OntoServer
side, OKBC is used to store the knowledge base into the Webocrat knowledge
base. Loading a newly created knowledge base into the OntoServer can be interpreted
as follows:
- Protégé opens a connection to
the OntoServer via OKBC.
- Protégé sends a new knowledge
base in Protégé format to the OntoServer via OKBC.
- The OKBC parses the knowledge
base, load it into memory, and send it to the OntoServer.
- The OntoServer receives the new
knowledge base and replaces the old Webocrat knowledge base in the memory
with the new one. This means that the OntoServer does not change the
knowledge base persistently.
- Protégé has to inform the
OntoServer to persistently store the new knowledge base.
The following section describes how to
carry out the five steps listed above.
In order to
load a newly created knowledge base into the Webocrat knowledge base, the
following steps have to be carried out.
Step 1: Running Protégé.
Protégé can be
found in $WEBOCRAT_HOME/tools/protégé. No installation is needed.
In order to run
Protégé, a Java Virtual Machine (JVM) is needed. A JDK (or JRE) version 1.2 (or above) has to be
installed. Then, the shell script, start_protégé.sh, which can be found in $WEBOCRAT_HOME/tools/protégé, must be executed. The script contains the
following command line.
java -Xmx200M
-classpath
$Protégé_HOME/Protégé.jar
edu.stanford.smi.Protégé.Application
Running Protégé from another directory can lead
to a failure in loading the plug-ins. At start-up time, Protégé lists six
plug-ins, which are located in $WEBOCRAT_HOME/tools/protégé/plugins, in the Protégé shell window. These
are
1. standard_extension.jar,
2. RelationTab.jar,
3. query_tab.jar,
4. OKBC_wcr_v_6_4.jar,
5. okbc.jar,
6. graphview.jar.
There are two
plug-ins which are used to establish a bi-directional communication between the
OntoServer and Protégé. These are "okbc.jar" and
"OKBC_wcr_v_6_4.jar".
Step 2:
Create a new project, or open an existing project.
For a Webocrat user who is unfamiliar with
Protégé, a Protégé project file, wolverhampton.pprj, can be used as an example.
The file can be found in $WEBOCRAT_HOME/tools/protégé/examples.
Open the project file from Project - Open menu item. Then, click the OKBC Webocrat tabbed panel. The
following figure shows the OKBC Webocrat tabbed panel.
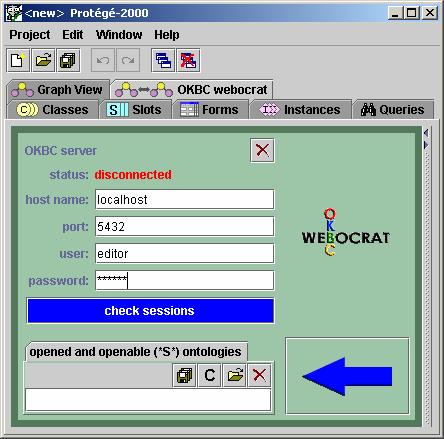
Figure 3.2
OKBC Tabbed Panel
Step 3: Select a session.
To select a session, each of the
following text fields should be filled with a valid value. For example,
hostname = localhost
port = 5432
user = editor
password = editor
(see figure 3.2). In this example, it is
assumed that the OntoServer is running on a localhost. The user and password
used are editor, which allows a Webocrat user to have a read and write
permission when dealing with the Webocrat knowledge base. Section 3.2 discusses
this issue in detail. Then, click the "check sessions" button. A
session dialog will be displayed as shown below.
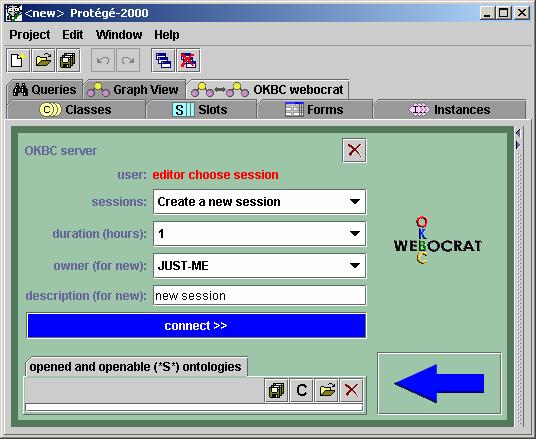
Figure 3.3
A session dialog
In the session dialog, a Webocrat user can
specify four session parameters. "Sessions" lists all the existing
sessions if any. The user may either join the existing session or create a new
session. "Duration" specifies how many hours a Webocrat user wants to
work in the session. "Owner" specifies the group which is allowed to
take part in the session, and have access to a knowledge base. In this example,
only the current user, JUST-ME is allowed to be in the session. Section 3.2
discusses this issue in detail. "Description" specifies the
description of a new session.
Step 4:
Open a connection to the OntoServer.
To open a connection to the OntoServer, click
the blue button, "connect >>"
(see figure 3.3). The following figure depicts a new dialog which shows
that a Webocrat user, "editor" has established a connection to the
OntoServer.

Figure 3.4
A dialog which shows that a connection to the OntoServer has been
established
Step 5:
Create a new Webocrat knowledge base.
To create a new Webocrat knowledge base, the
old reference, "webocrat_ontology" must be removed by selecting the
reference, and pressing the "delete" button which is located at the
fourth place from the left. Then, click the "create" button which is
located at the second place from the left. A dialog box will appear (see figure
3.5).
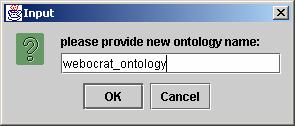
Figure 3.5 A dialog box in which a new ontology
name can be given
Creating a new knowledge base reference does
not mean that a new knowledge base has been created. At this time, the OntoServer
still has the old knowledge base reference. The newly created reference only
exists in the Protégé side.
In the case where we want to allow every
Webocrat user to view the newly created knowledge base from a browser, the text
field, which is associated with the label, Saving for: should be filled with
EVERYONE (as shown in figure 3.4).
Step 6:
Transfer and store a new knowledge base into the OntoServer persistently.
By now, it is assumed that a session has been
created, a connection to the OntoServer has
been established, and a new knowledge base reference has been created.
To transfer the newly created knowledge base to the OntoServer via OKBC, click
the blue arrow button which points to the left. As soon as the transfer is
started, the new knowledge base replaces the old one. At this point, the
changing only happens in the memory. The time needed for this task depends on
the size of the knowledge base being transferred. The larger the knowledge base
is, the longer the time needed for transferring the new knowledge base. Protégé
prints a message, done. on the shell window, when the transfer is complete.
To store the new knowledge base persistently,
click the "save" button which is located at the first place from the
left. In the case where we want to keep the old knowledge base, a backup copy
should be made before pressing the "save" button.
Step 7: Load the Webocrat ontology
from the OntoServer to the client-side.
To
load the Webocrat ontology from the OntoServer, go to the URL reference of the
admin page. For example, http://wolforum.webocrat.org/Webocrat/admin.
Then, use username = admin and password = admin to enter the administration
page of the Webocrat system. Choose the tabbed panel, Global settings, and
then click the Ontology Settings. The following figure depicts the Ontology
Settings dialog.

Figure 3.6 The Ontology Settings dialog
The final step is to press the Reload Ontology
Now button. The Ontology Settings dialog can be used to (1) determine how
often the Webocrat system should automatically reload Webocrat ontology from
the OntoServer by specifying the refresh interval; (2) reload the Webocrat
ontology at any time by pressing the Reload Ontology Now button.
Step 8:
Display the newly created ontology on a browser.
To see the
newly created ontology on a browser, you have to be loggen in into the
administrator user interface. When you browse to Association statistics, you
will see the list of all the ontology nodes. When you try to change association
of any of the published document, you will be redirected to the page, where
ontology structure is listed in tree.
The following table shows all the
user-password-permission combinations that a Webocrat user can choose, in order
to be able to register to the OntoServer.
|
User
|
Password
|
Permission
|
|
alien
|
no password required
|
read only
|
|
webocrat
|
wc
|
read only
|
|
admin
|
no password required
|
read and write
|
|
editor
|
editor
|
read and write
|
Table
3.1 User Password Permission Combinations
There are five different groups to which a
Webocrat user may belong. Table 3.2 shows the group permission combinations.
Table 3.3 shows the possible user group combinations.
The OntoServer stores the name of a user
who creates a knowledge base and the group to which the user belongs, into the
knowledge base. In other words, a knowledge base contains a creator name and
the associated group. This strategy ensures that only the creator itself and
other users who belong to the same group can access and modify the Webocrat
knowledge base. In a scenario where a user registers to the OntoServer as
"editor" and wants that the other users do not have access to a newly
created knowledge base, the user should select the group category,
"JUST-ME". This means that only the user itself can have access to
the knowledge base. It is recommended however to save a newly created knowledge
base for everyone (as shown in figure 3.4), so that every Webocrat user can
view, but not modify, the knowledge base.
There are three limitations that the
OntoServer does not support in this current release.
(1)
The users who belong to
"Administrators" or "WC_Editors" may join in one session,
and want to modify the Webocrat knowledge base at the same time. In this
current version, the OntoServer does not support a parallel update scenario.
Only one user can do update on the server side. The other users still have the
previous version of the knowledge base.
(2)
The OntoServer does not provide
a mechanism for loading a Webocrat knowledge base from the server into Protégé.
(3)
The passwords and groups, which
are listed in table 3.1, 3.2 and 3.3 cannot be modified.
The Webocrat system provides a mechanism
which enables users to use another language for graphical user interfaces. This
chapter describes how to setup a new language environment, so that the language
can be displayed in the Webocrat graphical user interfaces. There are eleven
language property bundles which are stored in ten separate directories. They
can be found in $WEBOCRAT_HOME/WEB-INF/classes/language. These are common,
citizen, cmm, dfm, doc, cat, opr, rep, tpm, web. Each directory contains three
property files. The directory, citizen, for example, contains
citizen.properties, citizen_en_GB, citizen_sk_SK. The first property file is
used as a default property. The second and third property files follow the
following naming convention.
[a language property name] :=
[the name of a directory] +
[_] + [language code] + [_] +
[country code]
+ [.properties]
In this current release, only british
English and Slovakian properties are available. In order to setup another
language, few lines of JSP codes should be integrated into the Webocrat system
and eleven new language properties have to be created. The eleven language
property bundles are listed below.
|
Language
Property Bundle
|
Property
File Path Reference
|
|
Common
|
$WEBOCRAT_HOME/WEB-INF/classes/language/common
|
|
Articles
|
$WEBOCRAT_HOME/WEB-INF/classes/language/doc
|
|
Discussion
Forums
|
$WEBOCRAT_HOME/WEB-INF/classes/language/dfm
|
|
Opinion
Polling
|
$WEBOCRAT_HOME/WEB-INF/classes/language/opr
|
|
Messages
|
$WEBOCRAT_HOME/WEB-INF/classes/language/rep
|
|
Submissions
|
$WEBOCRAT_HOME/WEB-INF/classes/language/cmm
|
|
Forms
|
$WEBOCRAT_HOME/WEB-INF/classes/language/cmm
|
|
Web
Resources
|
$WEBOCRAT_HOME/WEB-INF/classes/language/web
|
|
Tenders
|
$WEBOCRAT_HOME/WEB-INF/classes/language/tpm
|
|
Web
Categories
|
$WEBOCRAT_HOME/WEB-INF/classes/language/cat
|
|
Citizen
|
$WEBOCRAT_HOME/WEB-INF/classes/language/citizen
|
Table
4.1 The eleven language property bundles
The following sections describe how to
integrate few lines of JSP codes into the Webocrat system, and explain each of
the eleven property bundles.
The Webocrat system always uses the default
language property. In order to set another language variable, we need to add
the following JSP codes into $WEBOCRAT_HOME/admin/login.jsp and
$WEBOCRAT_HOME/login.jsp. An excerpt of the JSP file,
$WEBOCRAT_HOME/admin/login.jsp is depicted below.
<%
if (language != null) {
if
(language.compareToIgnoreCase("SK")==0) {
adminBean.setLanguage("common","sk","SK");
} else if (language.compareToIgnoreCase("GB")==0)
{
adminBean.setLanguage("common","en","GB");
} else{
adminBean.setModuleBundle("common");
}
} else{
adminBean.setModuleBundle("common");
}
%>
Let us assume that we want to define a
language code, called xx, which is used by a country, which has a country code
XX. The existing JSP page should then be modified as follows:
<%
if (language != null) {
if
(language.compareToIgnoreCase("SK")==0) {
adminBean.setLanguage("common","sk","SK");
} else if
(language.compareToIgnoreCase("GB")==0) {
adminBean.setLanguage("common","en","GB");
} else if
(language.compareToIgnoreCase("XX")==0) {
adminBean.setLanguage("common","xx","XX");
} else{
adminBean.setModuleBundle("common");
}
} else{
adminBean.setModuleBundle("common");
}
%>
In order to be
able to define another language through adminBean, the package,
org.webocrat.wbc.admin has to be included (or imported) in the two JSP pages,
and an object, called adminBean has to be defined as follows:
<%@
page import="org.webocrat.wbc.admin.*,
org.webocrat.wbc.*,
org.webocrat.wbc.util.*"
%>
<jsp:useBean
id="adminBean" scope="session"
class="org.webocrat.wbc.admin.AdminBean"/>
The same code should also be incorporated
into $WEBOCRAT_HOME/login.jsp. Then, the parameter, language has to be set with
the new language code when the JSP login page and the JSP admin login page are
called as follows:
http://wolforum.webocrat.org/login.jsp?language=XX
http://wolforum.webocrat.org/admin/login.jsp?language =XX
The
remaining sections discuss each language property.
The
language property bundle, common, contains the property variables which are
listed below. It can be found in
$WEBOCRAT_HOME/WEB-INF/classes/language/common. A part of the property
variables are associated with other Webocrat modules, such as discussion forums
and opinion polls. The values of the variables can be viewed in the graphical
user interfaces of the Webocrat administration pages. These values could be the
labels of menus, menuitems or buttons, or textual information.
|
Property Variable Name
|
Description
|
|
Error
|
A
general text error message when a file is missing.
|
|
no_java_script
|
An
error message which is given to a user when the browser used does not support
Java scripts.
|
|
admin_title
|
The
title text which appears on the top-right side of the front page of the
Webocrat administration site.
|
|
login_username
login_password
|
The
two labels which represent username and password; each of them is associated
with a text field. The two labels are located at the front page of the
Webocrat administration site.
|
|
login_login_button
login_lhelp_button
|
The
two buttons, login and help, which are located at the front page of the
Webocrat administration site.
|
|
header_Administration
|
The
administration header which is located at the top-left side of the Webocrat
administration main page.
|
|
header_Logout
|
The
label button, logout, which is located at the top-right side of the
Webocrat administration main page.
|
|
header_Global_settings
header_Categories
|
The
two main menus of the Webocrat administration main page. The main menus are
located below the administration header.
|
|
index_System_Settings
index_Users
index_Categories
index_Articles
index_Forums
index_Pollings
index_Messages
index_Submissions
index_Forms
index_Web_Resources
index_Tenders
|
The
eleven main menus of the Webocrat administration main page. The main menus
are located at the left side of the Webocrat administration main page. Each
menu contains several menu items.
|
|
index_Database_Info
index_Search_Settings
index_Ontology_Settings
index_Association_Statitics
index_Watch_Dog
|
The
five menu items belong to the System Settings menu.
|
|
index_User_Summary
index_Passwords
index_Create_User
index_Remove_User
index_Roles
|
The
five menu items belong to the Users menu.
|
|
index_Summary
index_Create
index_Edit_Properties
index_Remove
|
The
four menu items which belong to the Articles menu.
|
|
index_Summary
index_Create
index_Edit_Properties
index_Remove
index_Content
|
The
five menu items which belong to the Forums menu.
|
|
|
index_Summary
index_Create
index_Edit_Properties
index_Remove
index_Questions
|
The
five menu items which belong to the Polling menu.
|
|
|
index_Summary
index_Send
|
The
two menu items which belong to the Messages menu.
|
|
|
index_Submission_Summary
index_Remove_Submission
|
The
two menu items which belong to the Submissions menu.
|
|
|
index_Form_Summary
index_Add_New_Form
index_Edit_Form
index_Remove
|
The
four menu items which belong to the Forms menu.
|
|
index_Summary
index_Create
index_Edit_Properties
index_Remove
|
The
four menu items which belong to the Web Resources menu.
|
|
|
index_Tender_Summary
index_Create
|
The
two menu items which belong to the Tenders menu.
|
|
dbinfo_Database_information
dbinfo_Database_Properties
dbinfo_Name
dbinfo_Version
dbinfo_JDBC_Driver_-
Properties
dbinfo_Driver
dbinfo_version
dbinfo_Connection_URL
dbinfo_Connection_username
dbinfo_Database_Capabilities
dbinfo_Supports_transactions
dbinfo_Supports_multiple_-
connections
dbinfo_is_in_readonly_mode
dbinfo_Yes
dbinfo_No
|
Each
property variable belongs to the Database Info dialog. To get into this
dialog, click the Database Info menu item.
|
|
search_Search_Settings
search_The_search_indexer_-
periodically
search_If_you_choose_auto_-
indexing
serach_Auto_Indexing
search_On
search_Off
search_Index_Path
search_Last_indexed
search_Refresh_Interval
search_Refresh_every
search_hours
search_minutes
search_Update
search_Force_update_of_index
search_This_will_index
search_Update_Index_Now
|
Each
property variable belongs to the Search Settings dialog. To get into this
dialog, click the System Settings menu. Then, click the Search Settings
menu item.
There
are sixteen property variables. The two variables, search_Update and
search_Update_Index_Now are used as button labels. The two variables,
search_On and search_Off are used as radio button labels. The remaining
variables are used as labels or textual information.
|
|
Ontology_Settings
The_ontology_client_-
periodically
If_you_choose_auto_updating
Auto_Updating
onto_Last_updated
onto_Refresh_Interval
onto_Refresh_every
onto_hours
onto_minutes
Force_reload_of_ontology
This_will_reload_ontology_-
from_server
onto_Update
Reload_Ontology_Now
On
Off
|
Each
property variable belongs to the Ontology Settings dialog. To get into this
dialog, click the System Settings menu. Then, click the Ontology Settings
menu item.
There
are fifteen property variables. The two variables, onto_Update and Reload
Ontology Now are used as button labels. The two variables, On and Off,
are used as radio button labels. The remaining variables are used as textual
information or labels.
|
|
formsettings_WatchDog_-
Manager
formsettings_about
formsettings_warning_if_turn_-
off
formsettings_Auto_state_-
updating
formsettings_On
formsettings_Off
formsettings_Last_update_of_-
states
formsettings_Refresh_Interval
formsettings_Start_update_-
every
formsettings_hours
formsettings_minutes
formsettings_Samosprava_-
e_mail_address
formsettings_Webocrat_-
e_mail_address
formsettings_Update
formsettings_Update_-Submission_Processing_Now
formsettings_Force_update_of_-
submission_processing_states
formsettings_This_will_-update_any_states_of_sent_-submissions
|
Each
property variable belongs to the Watch Dog Manager dialog. To get into this
dialog, click the System Settings menu. Then, click the Watch Dog menu
item.
There
are seventeen property variables. Two of which are used as button labels.
These are formsettings_Update and
formsettings_Update_Submission_Processing_Now.
The remaining variable values are used as labels or textual information.
There
are six labels - in this dialog -
which cannot be modified. These are Mail_properties, Sending_host,
Receiving_host,
Receiving_protocol, User and
Password. The property bundle, common does not contain the six labels.
|
|
userc_No_users
userc_Try
userc_creating_one
userc_Choose_a_user
users_Users
users_Previous
users_show
users_users_per_page
users_Next
|
Each
property variable belongs to the User Summary dialog. To get into this
dialog, click the Users menu. Then, click the User Summary menu item.
|
|
usersr_Roles
User_Roles_For
Roles
Assigned_roles
Close
|
Each
property variable belongs to the User Roles dialog. To get into this
dialog, click the Users menu. Then, click the User Summary menu item.
Finally, click the Roles link.
|
|
pwd_System_Settings
pwd_Change_Passwords
pwd_All_fields_are_required
pwd_Please_re_enter_your
pwd_admin_password
pwd_Username_of_person_to_-
change
pwd_error
pwd_Error_no_password_-
entered
pwd_New_password
pwd_Confirm_new_password
pwd_Change_Password
|
Each
property variable belongs to the User Passwords dialog. To get into this
dialog, click the Users menu. Then, click the Passwords menu item.
There
are eleven property variables. One of which is used as a button label. That
is pwd_Change_Password. The remaining variables are used as labels.
|
|
creteuser_The_username
createuser_is_already_taken_-
Please_try_another_one
creteuser_error
creteuser_This_creates_a_user
creteuser_New_User_-
Information
creteuser_firstName
creteuser_lastName
creteuser_optional
creteuser_Email
creteuser_Username
creteuser_use_email
creteuser_Password
creteuser_again
creteuser_Users
creteuser_Create_User
creteuser_Cancel
|
Each
property variable belongs to the Create User dialog. To get into this
dialog, click the Users menu. Then, click the Create User menu item.
There
are sixteen property variables. Two of which are used as button labels. These
are creteuser_Create_User and creteuser_Cancel.
Three
of which are used to generate error messages. These are
creteuser_The_username,
createuser_is_already_taken_Please_try_another_one
and
creteuser_error.
The
remaining variable values are used as labels or textual information.
|
|
ruser_Users
ruser_Remove_User
ruser_Remove_This_User
|
Each
property variable belongs to the Remove User dialog. To get into this
dialog, click the Users menu. Then, click the Remove User menu item.
|
|
ruser_Remove
ruser_Warning_This_will_-
permanently_delete
ruser_Delete_User
ruser_Cancel
|
Each
property variable belongs to the Remove User dialog. To enter this dialog,
click the Users menu. Then, click Remove User menu item. Finally, select
a user name and click the Remove This User
button.
|
|
roles_Roles
roles_Previous
roles_show
roles_roles_per_page
roles_Next
roles_ID
roles_Name
roles_Description
roles_Remove
roles_Remove_Role
roles_Warning_This_will_-
permanently_delete
roles_Delete_Role
index_Roles
roles_Create_New_Role
createrole_Roles
createrole_Create_Role
createrole_The_name
createrole_is_already_taken_-
Please_try_another_one
createrole_error
creterole_This_creates_a_role
createrole_New_Role_-
Information
createrole_Description
createrole_Name
|
Each
property variable belongs to the Roles dialog. To enter this dialog, click
the Users menu. Then, click Roles menu item.
There
are twenty-three property variables. One of which is used as a button label.
That is roles_Create_New_Role. Three of which are used to generate error
messages. These are createrole_The_name,
createrole_is_already_taken_Please_try_another_one and createrole_error.
|
|
AssignPermissions
CreatePermissionsFor
create_permissions
operations
roles
Grand
Revoke
Cancel
|
Each
property variable belongs to Assign Permissions dialog. To get into this
dialog, click Summary menu item, which can be found in Articles, Pollings, Form Summary, Web Resources
or Tenders. Then, click one of the Permissions link.
There
are eight property variables. Three of which are used as button labels. These
are Grand, Revoke and Cancel.
|
|
link_Associations
link_Link_Resource
link_Associations_for
link_Required_resource_-cannot_be_loaded
link_Find_associations_-
according_to_name
link_Select_all_relevant_-
associations
link_Link
link_Close
link_Resources_associations
link_browse_associations
link_search_results
link_Update
link_Cancel
link_Remove
link_Add_checked
link_Find
link_Add
link_Add_All
link_Add_selected
|
Each
property variable belongs to Associations dialog. To get into an
Associations dialog, click Summary menu item, which can be found in
Articles, Pollings, Form
Summary, Web Resources or Tenders. Then, click one of the Associations
link.
There
are nineteen property variables; eight of which are used as button labels.
The remaining variables are used as textual information or labels.
|
Table 4.2 The language
property bundle, common.
The
language property bundle for articles contains the property variables which are
listed below. It can be found in $WEBOCRAT_HOME/WEB-INF/classes/language/doc.
|
Property Variable Name
|
Description
|
|
articles
links
view
articlesperpage
previous
next
id
properties
nodocresources
try
creatingone
Permissions
associations
|
Each
property variable belongs to the Articles Summary. To get into the
Articles Summary, click the Articles menu. Then click the Summary menu
item.
|
|
remove
|
The
property variable is a shared variable which is used in Articles Summary
and Remove Article dialog.
|
|
create
articlescreate
picturefile
articlebody
attachmentfile
|
Each
property variable belongs to the Create Articles. To get into the Create
Articles, click the Articles menu. Then, click Create menu item, which
is located at the right side of the Articles tabbed panel.
|
|
edit
articlesedit
Properties_for
body
update
cancel
|
Each
property variable belongs to the Edit Article Properties dialog. To get
into this dialog, click the Articles menu. Then, click Edit Properties
menu item. Finally, click the Edit button in the Edit Properties dialog.
|
|
title
subtitle
leadin
|
The
three property variables are shared variables which are used in the Article
Summary, Create Articles and Edit Article Properties dialog.
|
Table 4.3 The language
property bundle for articles
The
language property bundle for discussion forums contains the property variables
which are listed below. It can be found in
$WEBOCRAT_HOME/WEB-INF/classes/language/dfm.
|
Property Variable Name
|
Description
|
|
dfm_capital_forums
dfm_previous
dfm_next
dfm_show
dfm_forums_per
dfm_id
dfm_forum_name
dfm_desc
dfm_threads
dfm_messages
dfm_properties
dfm_permissions
dfm_search_content
dfm_search_remove
dfm_no_forum
dfm_try
dfm_create
|
Each
property variable belongs to the Forum Summary. To get into the Forum
Summary, click the Forums menu. Then click the Summary menu item.
|
|
dfm_create_forum
dfm_forum_name
forum_description
dfm_optional
dfm_error
dfm_input_create
dfm_nopermission
|
Each
property variable belongs to the Create Forum dialog. To get into this
dialog, click the Forums menu. Then click the Create menu item.
|
|
dfm_edit_forum_prop
dfm_properties_for
dfm_change_forum
dfm_change_desc
dfm_associations
dfm_input_update
dfm_capital_cancel
dfm_edit
|
Each
property variable belongs to the Edit Forum Properties dialog. To get into
this dialog, click the Forums menu. Then click the Edit Properties menu item.
Finally, click the Edit Properties button in the Edit Forum Properties
dialog.
|
|
dfm_moderated
dfm_unmoderated
dfm_moderate_threads
dfm_moderate_all
|
Each
property variable is a shared variable which is used in the Create Forum
and Edit Forum Properties dialog.
|
|
dfm_forums_remove
dfm_remove
dfm_thread
dfm_view
dfm_warning
dfm_all
dfm_delete_warning
dfm_delete_forum
dfm_cancel
|
Each
property variable belongs to the Remove Forum dialog. To get into this
dialog, click the Forums menu. Then click the Remove menu item.
|
|
dfm_forum_manage
dfm_threads_per_page
dfm_No_threads
dfm_topic
dfm_replies
dfm_date
dfm_delete
|
Each
property variable belongs to the Manage Forum Content dialog. To get into
this dialog, click the Forums menu. Then click the Content menu item. .
|
|
dfm_manage_thread
dfm_Approved
|
Each
property variable belongs to the Manage Thread Content dialog. To get into
this dialog, click the Forums menu. Then, click the menu item, Content.
Finally, click one of the topic references in the Manage Thread Content
dialog.
|
Table 4.4 The language
property bundle for discussion forums
The language property bundle
for opinion polling contains the property variables which are listed below. It can
be found in $WEBOCRAT_HOME/WEB-INF/classes/language/opr.
|
Property Variable Name
|
Description
|
|
Pollings
Previous
Next
show
pollings_per_page
ID
Polling_Name
Description
Edit
Properties
Question
Permissions
Remove
Print_Results
Results_num
No_pollings2
Try
creating_one
|
Each property variable
belongs to the Polling Summary dialog. To get into this dialog, click the
Pollings menu. Then, click the Summary menu item.
|
|
Questions
Edit_Questions
No_questions
Create_New_Question
questions_per_page
informal
|
Each property variable
belongs to the Questions dialog. To get into this dialog, click the
Pollings menu. Then, click the Summary menu item. Finally, click one of
the Questions link references.
|
|
Create_question
|
Each property variable
belongs to the Create New Questions dialog. To get into this dialog, go to
the Question dialog. Then, click the Create New Question button.
|
|
Yes
No
|
Each property variable
belongs to the Polling Results form. To get into this form, click the
Pollings menu. Then, click the Summary menu item. Finally, click one of
the Results link references.
|
|
Create_polling
Polling_name
Polling_name_is_required
Polling_description
Closing_date_must_be_after_starting_date
Closing_date_has_unknown_format
Error_creating_polling
Error_creating_question
Create
|
Each property variable
belongs to the Create Polling dialog. To get into this dialog, click the
Pollings menu. Then, click the menu item, Create.
|
|
Edit_This_Polling_Properties
Edit_Polling_Properties
Properties_for
Change_Polling_name
Change_Polling_description
Associations
No_pollings
|
Each property variable
belongs to the Edit Polling Properties dialog. To get into this dialog,
click the Pollings menu. Then, click the Edit Properties menu item.
Finally, click the Edit This Polling Properties button in the Edit Polling
Properties dialog.
|
|
Starting_Date
Closing_Date
optional
|
Each property variable is
a shared variable which is used in the Create Polling and Edit Polling
Properties dialogs.
|
|
Remove_Polling
Remove_This_Polling
Remove2
Warning_This_will_delete
all
questions_and_results_Are_you_sure
|
Each property variable
belongs to the Remove Polling dialog. To get into this dialog, click the
Pollings menu. Then, click the Remove menu item. Finally, click the
Remove This Polling
button in the Remove Polling dialog.
|
|
Edit_question
|
Each property variable
belongs to the Edit Questions dialog. To get into this dialog, click the
Pollings menu. Then, click the Questions menu item. Finally, click the
Edit Question
button in the Edit Question dialog.
|
|
Type
Answers
Question?
Question_is_required
yes_no
one_predefined_answer
many_predefined_answers
informal_question
You_must_define_only_two
You_cant_define_answer_for
You_must_define_some_answers
|
Each property variable is
a shared variable which is used in the Create Questions and Edit
Questions dialogs.
|
|
Remove_Question
Remove_question
results_Are_you_sure
|
Each property variable
belongs to the Remove Questions dialog. To get into this dialog, click the
Pollings menu. Then, click the Questions menu item. Finally, click one of
the Remove link references in the Edit Question dialog.
|
Table 4.5 The language property bundle for opinion pollings
The language property bundle
for messaging contains the property variables which are listed below. It can be
found in $WEBOCRAT_HOME/WEB-INF/classes/language/rep.
|
Property Variable Name
|
Description
|
|
Messages
Previous
Next
show
messages_per_page
ID
Channel
Headline
Text
Creation_Date
Remove
No_messages
Try
creating_one
|
Each property variable
belongs to the Message Summary dialog. To get into this dialog, click the
Messages menu. Then, click the menu item, Summary.
|
|
Messages_Remove_Message
Remove2
Warning_This_will_delete_message
Delete_Message
Cancel
|
Each property variable
belongs to the Remove Message dialog. To get into this dialog, click the
Messages menu. Then, click the menu item, Summary. Finally, click one of
the Remove link references.
|
|
Send_message
Message_headline
Message_text
optional
Recipients
Send
You_must_select_some_recipients
Message_headline_is_required
|
Each property variable
belongs to the Send Message dialog. To get into this dialog, click the
Messages menu. Then, click the menu item, Send.
|
Table 4.6 The language property bundle for messaging
The language property bundle
for submissions contains the property variables which are listed below. It can
be found in $WEBOCRAT_HOME/WEB-INF/classes/language/cmm.
|
Property Variable Name
|
Description
|
|
Submissions
SubmissionsPerPage
ID
User
Form
SendingDate
ModifiedDate
RemoveSubmission
ShowSubmission
|
Each property variable
belongs to the Submission Summary dialog. To get into this dialog, click
the Submissions menu, Then, click the menu item, Submission Summary.
|
|
RemoveSubmission
RemoveThisSubmission
|
Each property variable
belongs to the Remove Submission dialog. To get into this dialog, click the
Submissions menu, Then, click the menu item, Remove Submission.
|
|
NoSubmissions
|
This property variable is
used by Submission Summary and Remove Submission dialog.
|
|
Cancel
|
This property variable is
used in the Remove Submission dialog.
|
Table 4.7 The language property bundle for submissions
The language property bundle for forms contains the property
variables which are listed below. It can be found in
$WEBOCRAT_HOME/WEB-INF/classes/language/cmm.
|
Property Variable Name
|
Description
|
|
Forms
NoForms
Try
AddingOne
Previous
Next
show
FormsPerPage
ID
EditForm
Associations
Permissions
RemoveForm
ShowForm
|
Each property variable belongs to the Form Summary dialog. To
get into this dialog, click the Forms menu. Then, click Form Summary menu
item.
|
|
EditThisForm
PropertiesFor
ChangeFormName
ChangeFormDescription
ChangeFormTemplate
ChangeFormType
Associations
Update
|
Each property variable belongs to the Edit Form dialog. To get
into this dialog, click the Forms menu. Then, click the Form Summary menu
item. Finally, click one of the Edit Form link references in the Form
Summary dialog.
|
|
AddForm
FormName
FormDescription
FormTemplate
FormNameRequired
FormTemplateRequired
Add
|
Each property variable belongs to the Add New Form dialog. To
get into this dialog, click the Forms menu. Then, click the Add New Form
menu item.
|
|
RemoveForm
RemoveThisForm
Warning
all
AreYouSure
|
Each property variable belongs to the Remove Form dialog. To get
into this dialog, click the Forms menu. Then, click the Remove menu item.
|
Table 4.8 The language
property bundle for forms
The language property bundle
for Web resources contains the property variables which are listed below. It
can be found in $WEBOCRAT_HOME/WEB-INF/classes/language/web.
|
Property Variable Name
|
Description
|
|
links
previous
next
show
webresourcesperpage
nowebresources.
try
creatingone
id
properties
permissions
associations
remove
|
Each property variable
belongs to the Summary dialog. To get into this dialog, click the Web
Resources menu. Then, click the Summary menu item.
|
|
create
MimeType
optional
WebResource_name_is_required
|
Each property variable
belongs to the Create dialog. To get into this dialog, click the Web
Resources menu. Then, click the Create menu item.
|
|
Properties_for
associations
update
edit
|
Each property variable
belongs to the Edit Properties dialog. To get into this dialog, click the
Web Resources menu. Then, click the Edit Properties menu item.
|
|
Links
name
description
url
fullurl
|
Each property variable is
a shared variable which is used in Summary, Create and Edit Properties
dialog.
|
|
WebResources
|
The property variable
belongs to the Remove dialog. To get into this dialog, click the Web
Resources menu. Then, click the Remove menu item.
|
|
Remove
|
The property variable is a
shared variable which is used in the
Summary and Remove dialogs
|
|
Cancel
|
The property variable is
used as a button label which is used in Create, Edit Properties and
Remove dialog.
|
Table 4.9 The language property bundle for Web resources
The language property bundle
for tenders contains the property variables which are listed below. It can be
found in $WEBOCRAT_HOME/WEB-INF/classes/language/tpm.
|
Property Variable Name
|
Description
|
|
tpm_previous
tpm_next
tpm_tender_list
tpm_show
tpm_tenders_per
tpm_reference
tpm_tender_name
tpm_active
tpm_awarded
tpm_edit
tpm_permissions
tpm_remove
tpm_close
tpm_award
tpm_no_tenders
tpm_try
tpm_creating
|
Each property variable
belongs to the Tender Summary dialog. To get into this dialog, click the
Tender menu. Then, click the Tender Summary menu item.
|
|
tpm_view_tender
|
The property variable
belongs to the View Tender dialog. To get into this dialog, click the Tender
menu. Then, click the Tender Summary menu item. Finally, click one of the
tender link references in the Tender Summary dialog.
|
|
tpm_edit_tender
tpm_tender_required
tpm_reference_required
tpm_deadline_required
tpm_person_required
tpm_email_required
tpm_telephone_required
tpm_summary_required
tpm_document_name_required
tpm_location_required
tpm_Associations
|
Each property variable
belongs to the Edit Tender dialog. To get into this dialog, click the
Tender menu. Then, click the Tender Summary menu item. Finally, click one
of the Edit link references in the Tender Summary dialog.
|
|
tpm_title
tpm_tender_status
tpm_tender_active
tpm_tender_closed
tpm_reference_number
tpm_date_published
tpm_deadline
tpm_person
tpm_email
tpm_telephone
tpm_summary
tpm_date_awarded
tpm_award_details
tpm_document_name
tpm_document_location
tpm_document_type
tpm_error_viewing_tender
|
Each property variable is
a shared variable which is used in the View Tender and Edit Tender
dialogs.
|
|
tpm_remove_tender
tpm_delete_warning
|
Each property variable
belongs to the Remove Tender dialog. To get into this dialog, click the
Tender menu. Then, click the Tender Summary menu item. Finally, click one
of the Remove link references in the Tender Summary dialog.
|
|
tpm_close_tender
tpm_close_title
tpm_close_warning
|
Each property variable
belongs to the Close Tender dialog. To get into this dialog, click the
Tender menu. Then, click the Tender Summary menu item. Finally, click one
of the Close link references in the Tender Summary dialog.
|
|
tpm_award_tender
tpm_details
tpm_details_error
tpm_error
|
Each property variable
belongs to the Award Tender dialog. To get into this dialog, click the
Tender menu. Then, click the Tender Summary menu item. Finally, click one
of the Award link references in the Tender Summary dialog.
|
|
tpm_create_tender
tpm_create
tpm_error_creating
|
Each property variable
belongs to the Create Tender dialog. To get into this dialog, click the
Tender menu. Then, click the Create menu item.
|
|
tpm_tender
|
The property variable is a
shared variable which is used in Remove Tender and Close Tender dialogs.
|
|
tpm_tenders
|
The property variable is a
shared variable which is used in Edit Tender and Award Tender dialogs
|
|
tpm_cancel
|
The property variable is a
button label which is used in Edit Tender, Remove Tender, Close Tender
and Award Tender dialogs.
|
Table 4.10 The language property bundle for tenders
The language property bundle
for Web categories contains the property variables which are listed below. It
can be found in $WEBOCRAT_HOME/WEB-INF/classes/language/cat.
|
Property Variable Name
|
Description
|
|
cat_capital_categories
cat_previous
cat_next
cat_no_category
cat_try
cat_create
cat_show
cat_categories_per
cat_id
cat_desc
cat_properties
cat_remove_capital
cat_associations
|
Each property variable
belongs to the Web Category Summary dialog. To get into this dialog, click
the Categories menu. Then, click the Summary menu item.
|
|
cat_create_category
cat_input_create
category_description
cat_optional
cat_exist_error
|
Each property variable
belongs to the Create Category dialog. To get into this dialog, click the
Categories menu. Then, click the Create menu item.
|
|
cat_category_name
|
The property variable is a
shared variable which is used in Web Category Summary and Create Category
dialogs.
|
|
cat_edit_category_prop
cat_properties_for
cat_change_category
cat_change_desc
cat_input_update
cat_error
cat_edit
|
Each property variable
belongs to the Edit Properties dialog. To get into this dialog, click the
Categories menu. Then, click the Edit Properties menu item.
|
|
cat_parents
cat_childs
cat_remove_button
cat_Choose_categories
cat_parent_button
cat_child_button
|
The property variables are
shared variables which are used in Create Category and Edit Properties
dialogs.
|
|
cat_remove
cat_search_remove
cat_radio_edit
cat_radio_remove
cat_warning
cat_all
cat_delete_warning
cat_cancel
cat_goback
cat_categories_remove
cat_delete_category
|
Each property variable
belongs to the Remove Category dialog. To get into this dialog, click the
Categories menu. Then, click the Remove menu item. Finally, click the
Remove This Category button.
|
|
cat_capital_cancel
|
The property variable is a
shared variable which is used as a button label in the Create Category,
Edit Properties and Remove Category dialogs.
|
All the property bundles
which are described in section 4.2 4.11 belong to the Webocrat administration
Web site. The language property bundle, citizen, however, does not belong to
the Webocrat administration Web site. This is merely used in a Webocrat Web
site for a Webocrat user (citizen). The language property bundle can be found
in $WEBOCRAT_HOME/WEB-INF/classes/language/citizen, and contains the property
variables which are listed below.
|
Property Variable Name
|
Description
|
|
include.navbar.1
include.navbar.2
include.navbar.3
|
The three property
variables can be found in the front page of the Webocrat citizen Web site.
The variable, include.navbar.1 is the root of the Webocrat navigation
links. The variable, include.navbar.2 is used as the label of a search
button. The variable, include.navbar.3 is used as the label of an advanced
search menu item.
|
|
login.1
login.2.
login.3
login.4
login.5
login.6
login.7
|
The property variables
belong to the login dialog. To enter this dialog, click the login menu
which is located at the right side of the Webocrat citizen Web site.
The variables, login.1 and
login.2, are used for textual information. The variables, login.3, login.4
and login.5 are used as user name, password and required fields labels. The
variables, login.6 and login.7 are used as button labels for login and
cancel.
|
|
login.error.1
login.error.2
|
The property variables
belong to the login dialog. To enter this dialog, click the login menu
which is locate at the right side of the Webocrat citizen Web site. The value
of each variable can be seen when a login error has occurred.
|
|
include.user.1
include.user.2
include.user.3
include.user.4
include.user.5
include.user.6
|
All the property variables
are textual information which are used for describing login-related text
messages. The text messages are located at the right side of the Webocrat citizen
Web site.
|
|
createAccount.1
createAccount.2.
createAccount.3.
createAccount.4
createAccount.5
createAccount.6
createAccount.7
createAccount.8
createAccount.9
createAccount.10
createAccount.11
createAccount.12
createAccount.13
createAccount.14
createAccount.15
createAccount.16
createAccount.17
|
The property variables
belong to the create a new account dialog. To enter this dialog, click the
create a new account menu which is located at the right side of the
Webocrat citizen Web site.
Each variable is used as a
label except the two variables, createAccount.15 and createAccount.16; each
of them is used as a button label.
|
|
createAccount.error.1
createAccount.error.2
createAccount.error.3
createAccount.error.4
|
The property variables
belong to the create a new account dialog. To enter this dialog, click the
create a new account menu which is located at the right side of the
Webocrat citizen Web site.
The value of each variable
can be seen when an error has occurred or the new user information given are
not complete.
|
|
account.1
account.2
account.3
account.4
account.5
account.6
account.7
account.8
account.9
account.10
account.11
account.12
account.13
account.14
account.15
account.16
account.17
account.18
account.19
account.20
account.21
account.22
account.23
account.24
account.25
account.interval.1
account.interval.2
account.interval.3
account.interval.4
account.interval.5
|
The property variables
belong to the user profile dialog. To enter this dialog, a user should
login into the Webocrat citizen Web site. Then, click the Your Profile menu
which is located at the right side of the Webocrat citizen Web site.
|
|
account.error.1
account.error.2
account.error.3
account.error.4
account.error.5
account.error.6
|
The property variables
belong to the user profile dialog. To enter this dialog, a user should
login into the Webocrat citizen Web site. Then, click the Your Profile menu
which is located at the right side of the Webocrat citizen Web site.
These variables are only
used to display an error messages when an error has occurred.
|
|
resource.type.-1
resource.type.3
resource.type.6
resource.type.9
resource.type.10
resource.type.11
resource.type.12
|
Each property variable
represents the type of the information which are managed by the Webocrat
system. Resource type 3, for example, indicates that the information are
associated with a discussion forum.
|
|
article.1
articles.1
articles.2
articles.3
|
All the property variables
belong to an article site. To enter an article site, click an article link
reference which represents the title text of an article.
|
|
forum.1
forum.2
forum.3
forum.4
forum.5
forum.6
forum.7
forum.8
forum.9
forum.10
|
All the property variables
belong to a forum site. To enter a forum site, click a forum link reference
which represents a forum reference.
|
|
thread.1
thread.2
thread.3
thread.4
thread.5
thread.6
thread.7
thread.8
thread.9
thread.10
|
All the property variables
belong to a site which lists all the topics which refer to a discussion
forum. To enter this site, click a forum link reference which represent a
forum reference. Then, click a topic which refers to the forum reference.
|
|
forums.1
forums.2
forums.3
forums.4
forums.5
forums.6
forums.7
|
All the property variables
belong to the Webocrat Forums site. To enter this site, click the Webocrat
Forums navigation link which is located at the navigation bar.
|
|
tender.1
tender.2
tender.3
tender.4
tender.5
tender.6
tender.7
tender.8
tender.9
tender.10
tender.11
tender.12
|
All the property variables
belong to a tender site. To enter a tender site, click a tender link
reference which represents a tender reference.
|
|
tenders.1
tenders.2
tenders.3
tenders.4
tenders.5
tenders.6
|
All the property variables
belong to the Webocrat Tenders site. To enter this site, click the
Webocrat Tenders navigation link which is located at the navigation bar.
|
|
polling.1
polling.2
polling.3
polling.4
polling.5
polling.6
polling.7
polling.8
polling.9
polling.10
polling.11
polling.12
|
All the property variables
belong to a polling site. To enter a polling site, click a polling link
reference which represents a polling reference.
|
|
pollingResults.1
pollingResults.2
pollingResults.3
pollingResults.4
pollingResults.6
pollingResults.7
pollingResults.8
pollingResults.9
pollingResults.10
pollingResults.11
pollingResults.12
|
Each property variable
belongs to the Opinion Polling Result site. To get into this site, click
one of the polling result references.
|
|
pollings.1
pollings.2
pollings.3
pollings.4
pollings.5
pollings.6
pollings.7
pollings.8
|
All the property variables
belong to the Webocrat Pollings site. To enter this site, click the
Webocrat Pollings navigation link which is located at the navigation bar.
|
|
forms.1
forms.10
forms.14
forms.2
forms.5
forms.7
forms.8
forms.9
forms.21
forms.22
forms.4
forms.17
forms.11
forms.12
forms.6
forms.3
forms.13
forms.status.0
forms.status.1
forms.status.2
forms.status.3
|
All the property variables
belong to the Webocrat Forms and Submission site. To enter this site, click
the Webocrat Forms and Submission navigation link which is located at the
navigation bar.
|
|
iterator.1=Previous
iterator.2=Next
iterator.3=Pages:
|
The three variables are
shared variables which are used to navigate a number of different lists of
pages. The variable, iterator.1 is used as a label of a navigation link
which refers to the previous list of pages. In contrast, the variable,
iterator.2 is used as a label of a navigation link which refers to the next
list of pages. The variable, iterator.3 is used as a label which is
associated with the number of pages within a list.
|
|
search.result.1
search.result.2
search.result.3
search.banner.1
search.banner.2
search.banner.3
search.banner.4
search.banner.5
search.banner.6
search.1
search.2
search.3
search.4
search.5
search.6
search.7
search.8
search.9
search.10
search.11
search.12
search.13
search.14
search.15
search.16
search.17
search.date.1
search.date.2
search.date.3
search.date.4
search.date.5
search.sort.1
search.sort.2
|
All the property variables
belong to the Search dialog.
|
|
search.error.1
search.error.2
|
The two property variables
are used for representing textual information which state that a Webocrat
user enters an invalid search parameter into a search text field.
|
Table 4.11 The language property bundle for citizen